SCCM Collection Queries Running Slow? Split ‘Em up!

Like many of you, my SCCM environment contains a rather large number of collections (1000+).  These collections are used for various purposes from identifying systems with certain Software installed, or identifying systems by Hardware Attributes such as Make, Model or Free Disk Space.

For each one of these collections, we have different ways we can populate them with members.  We can use Direct Memberships, Collection Queries, or Collection Include/Exclude rules.  Microsoft has a nice little guide showing How to Create Collections which gives an explanation of each.  Go ahead and read up, I’ll wait…

Ok, now that you are all caught up on the various Collection Membership Rules, I want to dive into the Query Rule a bit further.  Again, Microsoft has some information on How to Create Query Rules.  If you are unfamiliar with this process, please read up before continuing.

Scenario

Lets say your environment has 10,000+ clients and you need to define a collection of systems that have Microsoft Visio Professional 2016 installed.  Lets lay out the criteria for this collection before we build it.

  • The collection must contain ALL instances of ‘Microsoft Visio Professional 2016’ regardless of architecture (x86 and x64)
  • The collection should be updated once per day and NOT use incremental updates.

If we take the above parameters into account, we should be able to come up with a collection query rule that looks something like this:


select SMS_R_SYSTEM.ResourceID,SMS_R_SYSTEM.ResourceType

,SMS_R_SYSTEM.Name,SMS_R_SYSTEM.SMSUniqueIdentifier

,SMS_R_SYSTEM.ResourceDomainORWorkgroup

,SMS_R_SYSTEM.Client from SMS_R_System

inner join SMS_G_System_ADD_REMOVE_PROGRAMS on SMS_G_System_ADD_REMOVE_PROGRAMS.ResourceID = SMS_R_System.ResourceId

inner join SMS_G_System_ADD_REMOVE_PROGRAMS_64 on SMS_G_System_ADD_REMOVE_PROGRAMS_64.ResourceID = SMS_R_System.ResourceId

where SMS_G_System_ADD_REMOVE_PROGRAMS.DisplayName = 'Microsoft Visio Professional 2016'

or SMS_G_System_ADD_REMOVE_PROGRAMS_64.DisplayName = 'Microsoft Visio Professional 2016'

As you can see from the above query, we are looking at both the 32-Bit and 64-Bit ADD_REMOVE_PROGRAMS WMI class.  Once the new collection is created, it will take a few moments for the Collection Evaluator to update the collection membership so we can see how many systems we have.  Each environment will vary on how long it takes to execute this query, and how many members the collection has once it has updated.

Analyzing the Results

The Collection Evaluator is the Site System component responsible for executing Collection Membership Queries and ultimately keeping your collections up to date.  Microsoft has an excellent tool that comes with the ConfigMgr Toolkit called CEViewer.exe which can be used to see all of your collections and details about their most recent evaluations.  Microsoft has a nice post on How to use CEViewer.exe.

If we open CEViewer on our Site Server and look at the last evaluation time for our new collection, we can see how much time it took for that evaluation to occur.   In our case here, we see that it took 28.18 seconds to evaluate.

ceviewer_visiopro_before

You may be asking what is an “acceptable” threshold for collection evaluations.  Unfortunately, I haven’t seen anything from Microsoft on the subject so here is my own personal recommendation.  If a collection evaluation takes more than 20 seconds, you should look at optimizing the query rules.

Help!  My collection evaluations are taking too long!

There are a couple of really simple tweaks we can make to help reduce our overall collection query evaluation times.  (NOTE: Making changes to existing collections or collection queries will immediately cause that collection to update its membership)

  1. Use SELECT DISTINCT
  2. Split up your Query Rules into individual Queries.

Lets start with the first item.  Using SELECT DISTINCT on all your query rules ensures that when a query rule is evaluated, each potential system will only be returned one time.  We can see the behavior of this using the Monitoring > Queries node in the ConfigMgr console.  Lets take a look at the difference between these two queries.  First, the “bad” way.

If we copy the query rule from above into a new Query Rule (Monitoring > Queries > New Query Rule) and execute it, we can see from the following screenshot that each Resource ID gets returned multiple times.  In this instance, they were each returned 59 times!

visiopro_query_multiple_ids

Now, lets try it using SELECT DISTINCT.


select distinct SMS_R_SYSTEM.ResourceID,SMS_R_SYSTEM.ResourceType

,SMS_R_SYSTEM.Name,SMS_R_SYSTEM.SMSUniqueIdentifier

,SMS_R_SYSTEM.ResourceDomainORWorkgroup

,SMS_R_SYSTEM.Client from SMS_R_System

inner join SMS_G_System_ADD_REMOVE_PROGRAMS on SMS_G_System_ADD_REMOVE_PROGRAMS.ResourceID = SMS_R_System.ResourceId

inner join SMS_G_System_ADD_REMOVE_PROGRAMS_64 on SMS_G_System_ADD_REMOVE_PROGRAMS_64.ResourceID = SMS_R_System.ResourceId

where SMS_G_System_ADD_REMOVE_PROGRAMS.DisplayName = 'Microsoft Visio Professional 2016'

or SMS_G_System_ADD_REMOVE_PROGRAMS_64.DisplayName = 'Microsoft Visio Professional 2016'

After running this new query, you can see that each Resource ID is only listed once and the total execution time is waaaay less.

visiopro_query_distinct_results

Now, lets go back to our collection and change it to use SELECT DISTINCT.  There are two ways you can do this.  First, is to edit the WQL directly as I’ve shown above.  The other (easier) way, is to just check this box.  And if you ask me, this should be checked by default!

query_omit_duplicate_rows

Divide And Conquer

The second way to speed up your collection evaluations is to split up your query rule into multiple query rules.  In our example, we are joining three different WMI classes (SMS_R_SYSTEM, SMS_G_ADD_REMOVE_PROGRAMS, SMS_G_ADD_REMOVE_PROGRAMS_64).  Running this query essentially pulls all results from all three classes, checks for the matches against DisplayName and THEN finally pulls them into the collection.  Even with SELECT DISTINCT, we are still having to pull ALL DISTINCT results from each class.

To improve the performance here, simply split out your query against SMS_G_ADD_REMOVE_PROGRAMS and SMS_G_ADD_REMOVE_PROGRAMS_64 into their own queries.  And don’t forget to use SELECT DISTINCT!

split-query-rules


select distinct SMS_R_SYSTEM.ResourceID,SMS_R_SYSTEM.ResourceType,SMS_R_SYSTEM.Name,SMS_R_SYSTEM.SMSUniqueIdentifier,SMS_R_SYSTEM.ResourceDomainORWorkgroup,SMS_R_SYSTEM.Client from SMS_R_System inner join SMS_G_System_ADD_REMOVE_PROGRAMS on SMS_G_System_ADD_REMOVE_PROGRAMS.ResourceID = SMS_R_System.ResourceId where SMS_G_System_ADD_REMOVE_PROGRAMS.DisplayName = "Microsoft Visio Professional 2016"


select distinct SMS_R_SYSTEM.ResourceID,SMS_R_SYSTEM.ResourceType,SMS_R_SYSTEM.Name,SMS_R_SYSTEM.SMSUniqueIdentifier,SMS_R_SYSTEM.ResourceDomainORWorkgroup,SMS_R_SYSTEM.Client from SMS_R_System inner join SMS_G_System_ADD_REMOVE_PROGRAMS_64 on SMS_G_System_ADD_REMOVE_PROGRAMS_64.ResourceId = SMS_R_System.ResourceId where SMS_G_System_ADD_REMOVE_PROGRAMS_64.DisplayName = "Microsoft Visio Professional 2016"

Now if we evaluate collection membership and go back to CEViewer, we can see that the evaluation time has drastically been reduced to well within our artificially defined “threshold”.

ceviewer_visiopro_after

Conclusion

To recap, use CEViewer to keep an eye on your Collection Evaluations.  In addition, when creating your collection queries make sure to use SELECT DISTINCT and split out your query rules to improve performance where possible.

Upgrading to Office 2016/365 using a ConfigMgr Task Sequence

Earlier this year I did a presentation at the Central Texas Systems Management User Group (CTSMUG) in Austin on migrating our company to Office 2016 (MSI).  I have provided a link to my Sway of that presentation for some general context however this blog post will be a more technical explanation of how I went about upgrading all our systems to Office 2016.

Prerequisites

  • Working knowledge of ConfigMgr 2012/Current Branch Task Sequences.
  • An existing Application/Package for installing Office 2016/365, Visio, Project, etc. (If you need assistance with this, there is plenty of guidance here and here)

Before we get going, we need to create a new package called “Office 2016 Upgrade Files”.  This package will consist of detection scripts, Office Scrub scripts and any other custom code used for your overall upgrade process.  (NOTE: This package should NOT contain any of the actual Office installer binaries).

New-CMPackage -Name 'Microsoft Office 2016 Upgrade Files' -Path '\\SERVER\SOURCES\Microsoft Office 2016 Upgrade Files'

Content

Start by downloading the following scripts:

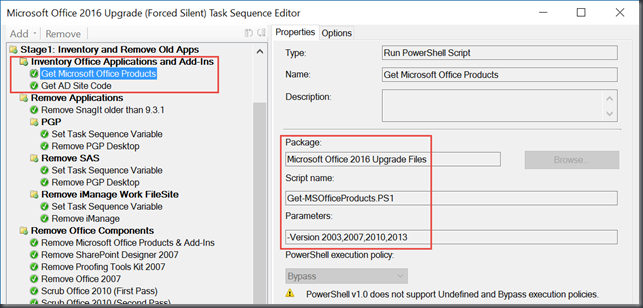
  • Get-MSOfficeProducts.ps1 – I developed this script to detect as many Microsoft Office (non-server) products that I had in my environment (NOTE: The language packs section needs improvement to cover more languages).
  • IME14-Cleanup.ps1 – This cleans up registry keys associated with the Office IME (Input Method Editor).

Next, use the “Easy Fix Download” link to obtain and extract the Office Scrub scripts for Office 2010+

Task Sequence – Detection

Start out by creating a new (empty) Custom Task Sequence.  The first stage of our Task Sequence will include detecting the software currently installed on the system.  This is broken out (generally) into two different groups.

  • Microsoft Office Suites and Applications (i.e. Visio, Project, Language Packs)
  • Office-Dependent Applications – Other software packages that have a dependency on one or more Office applications that may need special attention (reinstall) during an Office upgrade.

image

Removal

The next section will contain various scripts and command lines that we’ll use to remove Office-Dependent products and Office itself. First off, create a group (generally via WMI query or a file check) to detect and remove each application.  Be sure to add a custom Task Sequence variable as indicated in the screenshot above so you can use that to re-install the software later.

You “CAN” upgrade Office in-place without removing previous suites, however I always run into legacy shared components that get left behind.  When these are left behind, the system still  downloads ALL of the updates for the full suite (including service packs) so I prefer to perform a rip and replace of the Office suite.

Once you have removed the Office-Dependent applications, the next set of steps will systematically remove Microsoft Office.  I’ll list this out in order of how we did it as we had excellent success with this specific order of operations no matter what the system had installed.

  1. Remove Microsoft Office – This uses the Get-MSOfficeProducts.ps1 script from the Detection step but with the added –Uninstall parameter.  This step works well to remove Office 2003 components and some of the newer components using standard methods. NOTE: There is an Office Scrub script for Office 2003 available however I never verified that it worked. image
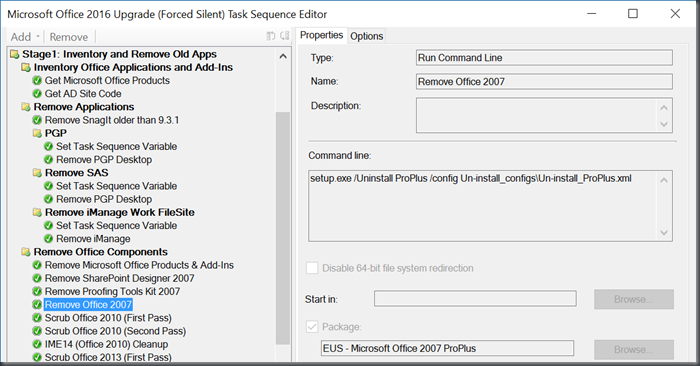
  2. Uninstall Office 2007 – I used the main Office 2007 Professional Plus installation media with custom Uninstall XML files to remove SharePoint Designer, Proofing Tools and the rest of the suite (in that order) since I already had the original package used to install it.  I’m not doing anything else related to Visio/Project or Language Packs during this section. NOTE: There is an Office Scrub script for Office 2007 available however I never verified that it worked. image
  3. Uninstall Office 2010/2013/2016 – Microsoft has published “scrub” scripts for each version of Office that work incredibly well.  Set these up as Run Command Line Steps in your Task Sequence with the following Command Line parameters for each:

Scrub Office 2010

cscript.exe OffScrub10.vbs ALL /log "C:\Windows\Temp" /quiet

Scrub Office 2013

cscript.exe OffScrub15.vbs ALL /log "C:\Windows\Temp" /quiet

Scrub Office Click-To-Run – Use this if you are installing Office 2016 MSI

cscript.exe OffScrubc2r.vbs ALL /log "C:\Windows\Temp" /quiet

Scrub Office 2016 – Use this if you are installing Office 365 Click-To-Run

cscript.exe OffScrub16.vbs ALL /log "C:\Windows\Temp" /quiet

NOTE: The scrub scripts run twice as sometimes the scrub fails due to a corrupted installation.  Running it twice typically takes care of things.

NOTE: You’ll want to run the Office 2016/C2R scripts to remove any potentially conflicting applications before installing Office.  C2R and MSI (2016) builds cannot co-exist.

Install Office 2016/365

Before you start installing Office 2016/365, consider rebooting the system.  This can often be required if you had to remove other Non-Office applications as part of your upgrade path.

I’m using the Application Model for all Office installers.  I have separate applications for the Office Suite separating 32-bit/64-bit.  All other Office components have both 32-bit and 64-bit within the same application.

During this section is where we will leverage the Task Sequence variables created by the Get-MSOfficeProducts.ps1 script to determine which components to reinstall.

Microsoft Office ProPlus Suite (32-bit/64-bit)

Use the MsOfficeSuiteArch TS Variable to determine which architecture of Office to install.

image

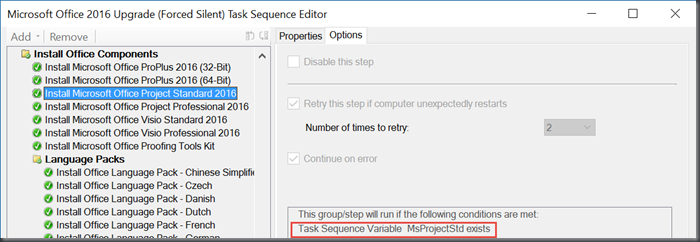
Microsoft Project (Standard/Professional)

Use the MsProjectStd or MsProjectPro TS Variables to determine if Project Standard or Professional needs to be reinstalled.

image

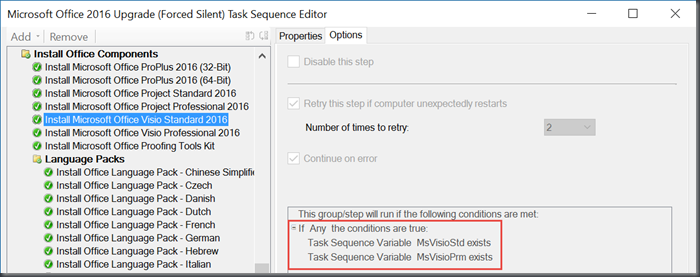
Microsoft Visio (Standard/Professional)

Use the MsVisioStd, MsVisioPrm or MsVisioPro TS Variables to determine if Visio Standard or Professional needs to be reinstalled.

image

Microsoft Proofing Tools Kit

Use the MsProofKit TS Variable to determine if the Proofing Tools Kit needs to be reinstalled.

image

Microsoft Office Language Packs

We use the Application Model for installing Office Language Packs.  These are separated by Language, and contain Deployment Types for each Office Version/Architecture to make things easy (for us and the end user).  Take note of the priority order.

image

Use the following TS Variables for Language selection:

  • MsLpChinese
  • MsLpCzech
  • MsLpDanish
  • MsLpDutch
  • MsLpFrench
  • MsLpGerman
  • MsLpHebrew
  • MsLpItalian
  • MsLpKorean
  • MsLpPolish
  • MsLpRussian
  • MsLpSpanish
  • MsLpSwedish

image

Re-Install Additional Applications

Here is where we begin reinstalling all of our Non-Office applications back onto the system.  This could either be a simple re-install, configuration change, or an update to an application to enable compatibility with the Office 2016 suite.

License Activation

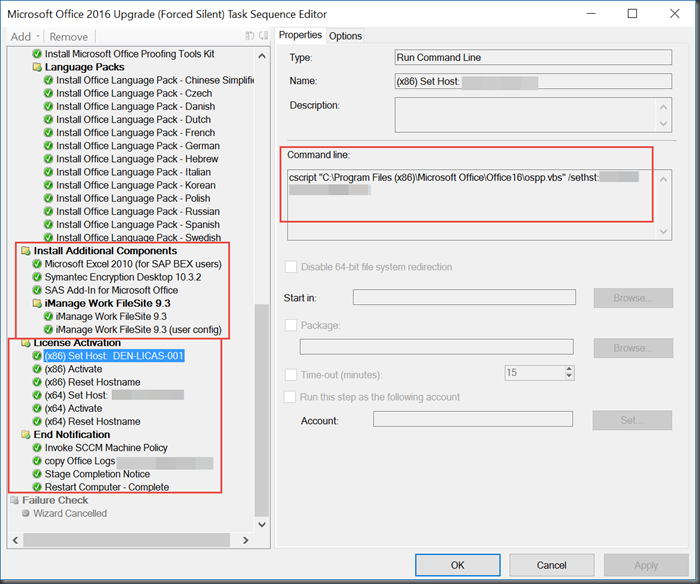
We ran into some issues with KMS activation during our upgrades (using the MSI installer) so we added in the necessary ospp.vbs commands to activate Office in an attempt to “force” activation immediately after installation.  This reduced the number of helpdesk calls we received when activation took longer than normal.imageEnd Notification

Finally, we end the deployment by forcing a machine policy update, copying off log files and notifying the end user that the upgrade is complete (Notification HTA runs via the RunOnce registry key).

ConfigMgr Updates and Servicing Download Issues

I recently rebuilt my lab environment using Johan Arwidmark’s excellent Hydration Kit.  As part of this lab environment, I also setup a Virtual Router using Johan’s other guide http://deploymentresearch.com/Research/Post/387/Install-a-Virtual-Router-based-on-Windows-Server-2012-R2-using-PowerShell

If you haven’t considered using Johan’s hydration kit or virtual router setup, you should.  They are quick and easy (and repeatable).

I rebuilt the lab environment to test the new CM1606 upgrade in an environment setup more closely to my production environment.  After building the Domain Controller, Primary Site server and a couple clients to test with, it was time to start setting up all the necessary roles (Software Updates, Service Connection Point, etc.) and verify everything was working before testing the new CM1606 upgrade.

Issue

After verifying that the basics were working, it was time to upgrade to CM1602 and then 1606 using the nice new In-Console Updates and Servicing Node.  I checked the node, and it still said downloading.  I waited a day, restarted SMS_EXECUTIVE service, even rebuilt the entire lab using new media.

I checked the dmpdownloader.log and saw the error:

ERROR: Failed to call IsFileTrusted

clip_image001

I found another post with this same error but I the suggested fixes didn’t help me any.  I even tried the registry fix in the Release Notes.  Nothing.

Checking the EasySetupPayload directory I could see that the update files were actually downloaded.

clip_image001[5]

Checking the corresponding directory… rats. Empty.

clip_image001[7]


Resolution

After a series of trial and error (and a bit of cursing), I stumbled across a solution to my problem.

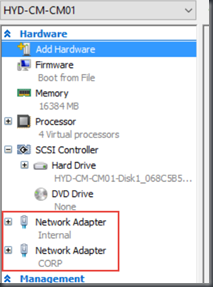
As part of the Virtual Router setup and overall lab configuration, I configured an Internal Hyper-V network for all my lab VM’s to run on.  The Virtual Router was configured with two VM’s and setup in a NAT configuration so the LAB VM’s could get out to the internet.

Here’s the issue (kind of).  On my ConfigMgr Site Server, it was only connected to the Internal Hyper-V Network.  So I decided to bypass the Virtual Router and add a second External (CORP) Network Adapter to the ConfigMgr Primary Site Server.

image

After booting the VM back up, ConfigMgr was able to successfully download and extract the updates and I was able to proceed with the upgrade.

Summary

So if you are using a Virtual Router for your ConfigMgr lab, make sure you give your Site Server direct access to the internet instead of routing it thru a Virtual NAT router.

MBAM Supported Computers Collection Issues after ConfigMgr 1606 Upgrade

I’ve been running on ConfigMgr 1602 since it was released and have had my environment integrated with Microsoft BitLocker Administration and Monitoring (MBAM) 2.5 SP1 since day one.  It’s worked wonderfully up until I applied the ConfigMgr 1606 in-console update.

For those of you that are not familiar with MBAM and it’s integration with ConfigMgr, check out Eswar Koneti’s excellent guide:

http://eskonr.com/2015/09/how-to-install-mbam-2-5-sp1-and-integrate-with-sccm-configmgr-2012-r2-sp1/

Issue

After the ConfigMgr 1606 update (Site Upgrade, not clients), I noticed an issue with the MBAM Supported Computers collection (which gets created as part of the MBAM + ConfigMgr Integration).  There were only about 500 systems out of ~14,000 that were in the collection now!

Over the next few days, that count slowly (and I mean slowly) grew to about 1,500 clients.  The collection member count fluctuated a few hundred each day but never got above about 1,700 clients.

Troubleshooting

I looked at the usual suspects like the Collection Evaluator being slow, WMI classes on the clients, and verified that clients were actually submitting Hardware Inventory (they were).

Upon looking further, there was 1 SQL View that wasn’t fully populated.  v_GS_TPM (Win32_TPM in HW Classes) is available for inventory right out of the box.  However MBAM requires it to be extended to include 3 properties.

image

I checked the number of rows in this SQL view using the following SQL script:

Select *
From v_GS_TPM

This returned only about 600-700 rows out of nearly 15K!  Checking some of the other MBAM Views such as v_GS_MBAM_POLICY or v_GS_BITLOCKER_DETAILS resulted in the proper number of rows.

Solution

The solution I came up with was to simply force a Full Hardware Inventory Scan on every client.  Once the clients forced a full update, they started showing back up in the collection and were happy again.

Note: You’ll want to stagger this deployment so you don’t overload your site server(s)!

Here are the PowerShell commands I strung together (Credit to Kaido Järvemets @kaidja) and deployed out via Package/Program to all my clients:

$HardwareInventoryID = '{00000000-0000-0000-0000-000000000001}'
Get-WmiObject -Namespace 'Root\CCM\INVAGT' -Class 'InventoryActionStatus' -Filter "InventoryActionID='$HardwareInventoryID'" | Remove-WmiObject
Invoke-WmiMethod -Namespace root\CCM -Class SMS_Client -Name TriggerSchedule -ArgumentList "$HardwareInventoryID"

Root Cause

At the time this article was written I do not know the root cause but I have been talks with a PFE and members of the product group to track it down.  I hope that this post will help others out there until the root cause can be determined and a fix put in place.